Preferences
WARNING
This documentation is for GNOME 45 and later. Please see the Legacy Documentation for previous versions.
Creating a preferences window for your extension allows users to configure the appearance and behavior of the extension. It can also contain documentation, a changelog and other information.
The user interface will be created with GTK4 and Adwaita, which has many elements specifically for settings and configuration. You may consider looking through the GNOME Human Interface Guidelines, or widget galleries for ideas.
See Also
GSettings
GSettings provides a simple, extremely fast API for storing application settings, that can also be used by GNOME Shell extensions.
Creating a Schema
TIP
A GSettings schema ID with the prefix org.gnome.shell.extensions and a path with the prefix /org/gnome/shell/extensions is the standard for extensions.
Schema files describe the types and default values of a particular group of settings, using the same type format as GVariant. The basename of the schema file should be the same as the schema ID.
Start by creating a schemas/ subdirectory to hold the GSettings schema:
$ mkdir -p ~/.local/share/gnome-shell/extensions/example@gjs.guide/schemas
$ cd ~/.local/share/gnome-shell/extensions/example@gjs.guide
$ touch schemas/org.gnome.shell.extensions.example.gschema.xml
Then using your editor, create a schema describing the keys and type of values they can hold:
<?xml version="1.0" encoding="UTF-8"?>
<schemalist>
  <schema id="org.gnome.shell.extensions.example" path="/org/gnome/shell/extensions/example/">
    <key name="show-indicator" type="b">
      <default>true</default>
    </key>
  </schema>
</schemalist>
Compiling a Schema
TIP
As of GNOME 44, settings schemas are compiled automatically for extensions installed with the gnome-extensions tool, GNOME Extensions website, or a compatible application like Extension Manager.
Before it can be used, a GSettings schema must be compiled. If not using the gnome-extensions tool, glib-compile-schemas can be used to compile schemas:
$ cd ~/.local/share/gnome-shell/extensions/example@gjs.guide
$ glib-compile-schemas schemas/
Integrating Settings
TIP
For complex settings, see the GVariant Guide for examples of what data types can be stored with GSettings.
GSettings is supported by a backend, which allows different processes to share read-write access to the same settings values. This means that while extension.js is reading and applying settings, prefs.js can be reading and modifying them.
Usually this is a one-way relationship, but it is possible to change settings from extension.js as well, if necessary.
metadata.json
The recommended method for defining the schema ID for an extension is by defining the settings-schema key in metadata.json. This allows GNOME Shell to automatically use the correct schema ID when ExtensionsBase.prototype.getSettings() is called.
{
    "uuid": "example@gjs.guide",
    "name": "Example Extension",
    "description": "An example extension with preferences",
    "shell-version": [ "45" ],
    "url": "https://gjs.guide/extensions",
    "gettext-domain": "example@gjs.guide",
    "settings-schema": "org.gnome.shell.extensions.example"
}
Otherwise, you should call ExtensionBase.prototype.getSettings() with a valid GSettings schema ID.
getSettings() in extension.js
import {Extension} from 'resource:///org/gnome/shell/extensions/extension.js';


export default class ExampleExtension extends Extension {
    enable() {
        this._settings = this.getSettings('org.gnome.shell.extensions.example');
    }

    disable() {
        this._settings = null;
    }
}
getSettings() in prefs.js
import {ExtensionPreferences} from 'resource:///org/gnome/Shell/Extensions/js/extensions/prefs.js';


export default class ExamplePreferences extends ExtensionPreferences {
    fillPreferencesWindow(window) {
        window._settings = this.getSettings('org.gnome.shell.extensions.example');
    }
}
extension.js
Methods like Gio.Settings.get_boolean() are used for native values, while methods like Gio.Settings.set_value() can be used to work with GLib.Variant values directly.
Simple types like Boolean can be bound directly to a GObject Property with Gio.Settings.bind(). For JavaScript properties and other use cases, you can connect to Gio.Settings::changed with the property name as the signal detail (e.g. changed::show-indicator).
import Gio from 'gi://Gio';
import St from 'gi://St';
import {Extension, gettext as _} from 'resource:///org/gnome/shell/extensions/extension.js';
import * as Main from 'resource:///org/gnome/shell/ui/main.js';
import * as PanelMenu from 'resource:///org/gnome/shell/ui/panelMenu.js';
export default class ExampleExtension extends Extension {
enable() {
// Create a panel button
this._indicator = new PanelMenu.Button(0.0, this.metadata.name, false);
// Add an icon
const icon = new St.Icon({
icon_name: 'face-laugh-symbolic',
style_class: 'system-status-icon',
});
this._indicator.add_child(icon);
// Add the indicator to the panel
Main.panel.addToStatusArea(this.uuid, this._indicator);
// Add a menu item to open the preferences window
this._indicator.menu.addAction(_('Preferences'),
() => this.openPreferences());
prefs.js
TIP
Extension preferences run in a separate process, without access to code in GNOME Shell, and are written with GTK4 and Adwaita.
The Adwaita Widget Gallery has screenshots of the many widgets it includes that make building a preferences dialog easier. You may also use any of the GNOME APIs that are compatible with GTK4 (notable exceptions include Meta, Clutter, Shell and St).
Extensions should implement fillPreferencesWindow(), which is passed a new instance of Adw.PreferencesWindow before it is displayed to the user.
import Gio from 'gi://Gio';
import Adw from 'gi://Adw';
import {ExtensionPreferences, gettext as _} from 'resource:///org/gnome/Shell/Extensions/js/extensions/prefs.js';
export default class ExamplePreferences extends ExtensionPreferences {
fillPreferencesWindow(window) {
// Create a preferences page, with a single group
const page = new Adw.PreferencesPage({
title: _('General'),
icon_name: 'dialog-information-symbolic',
});
window.add(page);
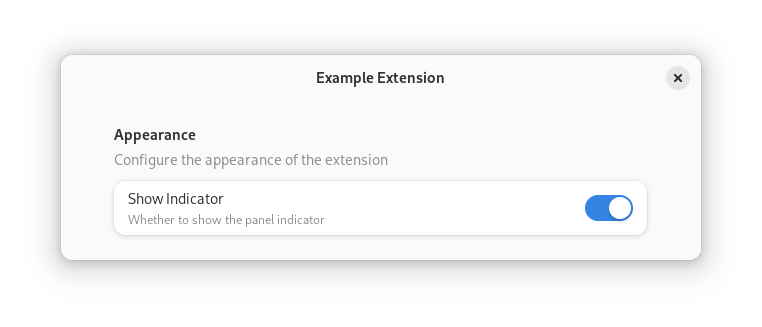
const group = new Adw.PreferencesGroup({
title: _('Appearance'),
description: _('Configure the appearance of the extension'),
});
page.add(group);
// Create a new preferences row
const row = new Adw.SwitchRow({
title: _('Show Indicator'),
subtitle: _('Whether to show the panel indicator'),
});
group.add(row);
// Create a settings object and bind the row to the `show-indicator` key
window._settings = this.getSettings();
window._settings.bind('show-indicator', row, 'active',
Gio.SettingsBindFlags.DEFAULT);
}
}Testing the Preferences
The preference dialog can be opened with gnome-extensions prefs, or any other tool for managing extensions:
Debugging prefs.js
Because preferences are not run within gnome-shell but in a separate process, the logs will appear in the gjs process:
$ journalctl -f -o cat /usr/bin/gjsDebugging GSettings
To help debug the changes made by prefs.js to GSettings values, you can use dconf to watch the path for your settings:
$ dconf watch /org/gnome/shell/extensions/exampleNext Steps
By now you should have a simple extension, ready to accept translations into other languages, with basic preferences.
As your extension evolves you may want to customize the user interface by creating your own widgets. If so, you should familiarize yourself with basic Accessibility concepts.